How to Carry Out a Primary Survey Using the DR ABCDE Steps
Having the knowledge of how to react in a medical emergency and give first aid is an important skill that everyone should feel confident in. You never know when you might need to put these skills to use and assist someone in a potentially life-threatening situation.
In this article, we explain how you should carry out an initial assessment of someone who is injured or ill. This is known as the primary survey and the steps can be remembered using the acronym DR ABCDE.
What is the Primary Survey in First Aid?
The primary survey is the first step of a first aid assessment and should be used when someone has been injured or become unwell.
It is intended to help you to quickly identify whether there is an immediate threat to the casualty’s life. Applying the primary survey will allow you to determine whether someone has any injuries or illnesses that could be life-threatening and so need to be responded to immediately.
The action you subsequently take may well save their life, so it is important that you understand how to carry out the steps in the correct order. This allows you to consider serious health complications in order of priority, firstly assessing those that will cause fatality the quickest.

When Should the Primary Survey Be Used?
You should use the primary survey whenever you discover a casualty – someone who is injured or has fallen ill. This may be due to an identifiable accident or incident, such as a fall, or the cause may initially be unapparent, such as due to an individual’s long-term medical condition, like diabetes.
Anyone can use the primary survey to assess a casualty. However, if a qualified first aider is present, they will likely carry out this initial assessment and then administer any treatment to the casualty. Note that qualified first aiders must have taken practical training of at least 18 contact hours.
If a qualified first aider cannot attend, then some workplaces may have an appointed person present. Appointed persons are in charge of first aid arrangements at workplaces. Depending on the individual’s role and competence, the appointed person may also be able to provide emergency cover, including carrying out the primary survey, if a first aider is absent due to unforeseen circumstances.
If someone requires first aid assistance outside of a workplace, such as in your home, you can carry out the primary survey yourself if you feel competent in doing so. This action may save the casualty’s life and so it is crucial that you understand how to carry out the primary survey and address any life-threatening issues before emergency medical help arrives.
Need a Course?
Our CPR Awareness training course is suitable for anyone who wants an understanding of how to carry out CPR, as well as those who want to refresh their existing knowledge. It is designed to help ensure as many people as possible have an awareness level of how to recognise when someone needs CPR and how to administer it.
How Do I Use the DR ABCDE Steps?
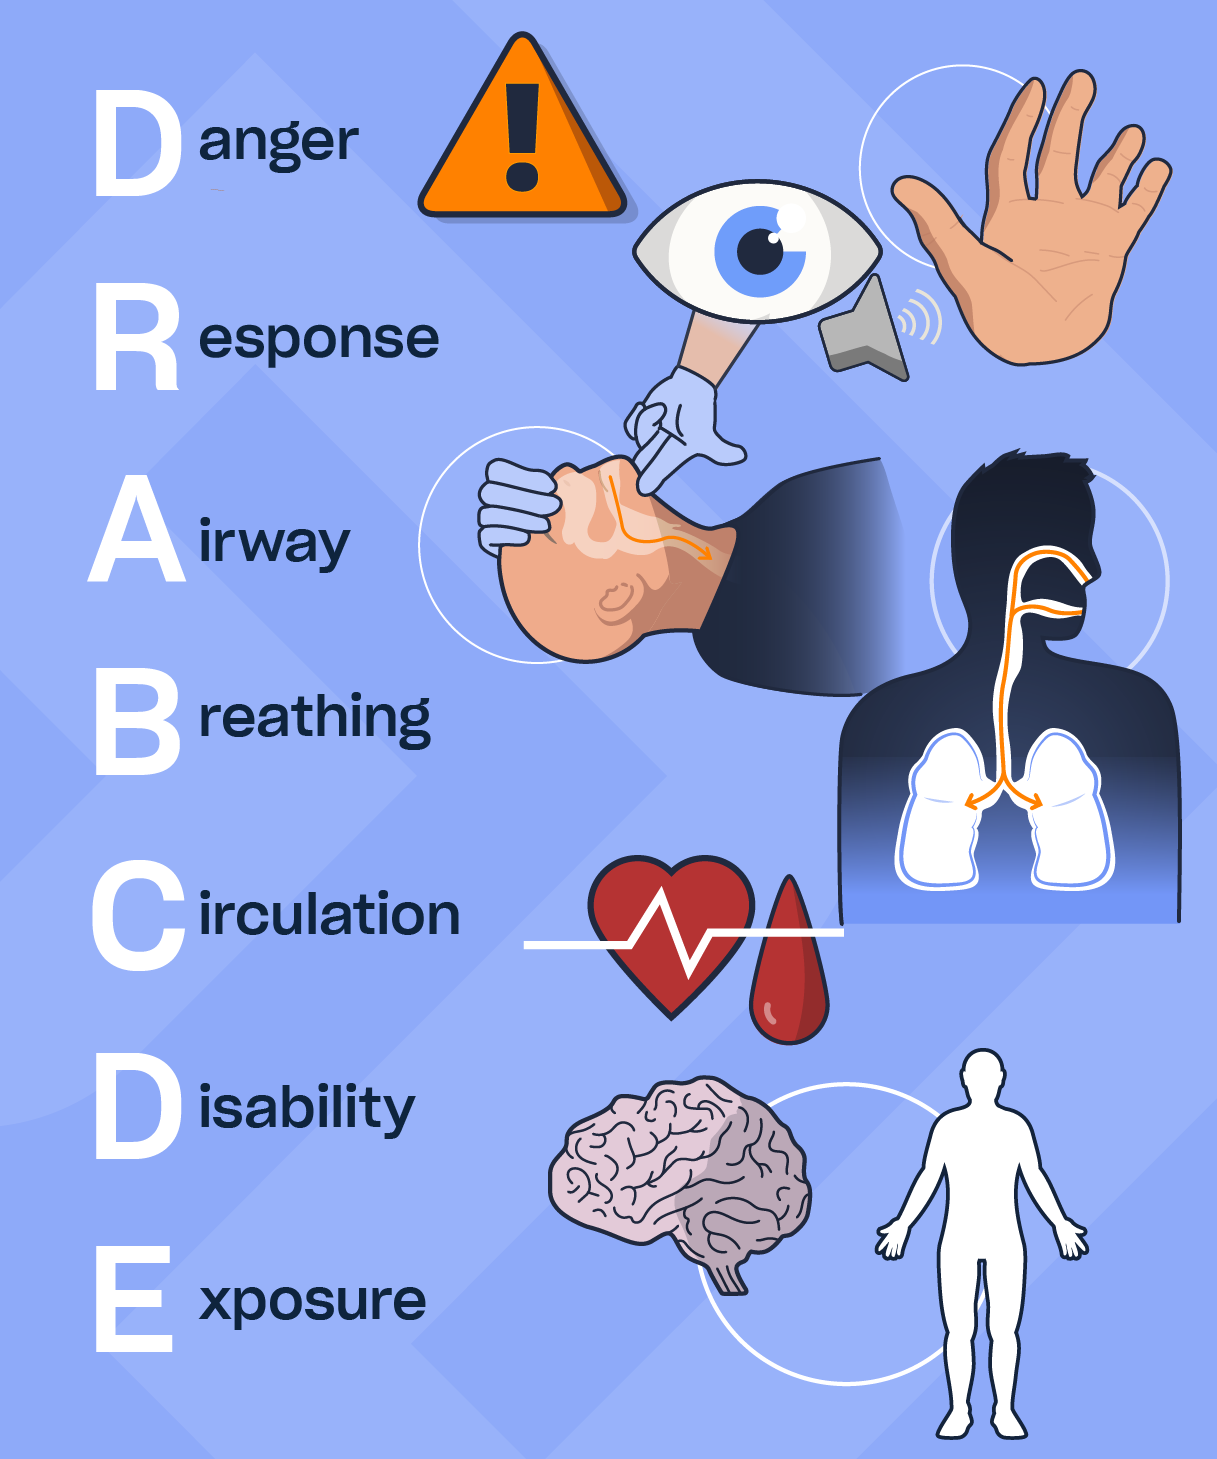
You can remember the key steps of the primary survey with the acronym DR ABCDE. These must be followed as they are, in order of priority, to ensure the most life-threatening conditions are assessed and treated first.
The DR ABCDE steps are:
- Danger
- Response
- Airway
- Breathing
- Circulation
- Disability
- Exposure
Step 1 – Danger
The first step in the primary survey is to identify any danger in the casualty’s environment. This means you need to look around the area for anything that could be a potential risk to you, the casualty, or anyone else nearby.
Signs of danger may include:
- Slip and trip hazards, such as cables.
- Moving vehicles or active machinery.
- A live electrical current.
- Fire and/or smoke.
If any dangers are identified, you need to respond to them and make the area safe if you can do so safely. This must be done before anyone approaches the casualty. Once you’ve made the area safe, or it was safe to begin with, you can safely approach the casualty.
If you cannot make the area safe, you must not approach the casualty and should instead call for help. In all emergency situations, if you are unsure about what to do or feel that you need some assistance, call 999 or 112 for urgent help.
Step 2 – Response
Once you have ensured it is safe to approach the casualty, you must identify if they are responsive. You should do this by asking them verbally whether they’re ok, to open their eyes and look at you, or to raise their hand. If they open their eyes, speak or make a gesture then they are responsive and you can start to tend to any injuries or illness they may have.
If there’s no response, gently tap them on the tops of their arms and gently shake or squeeze their shoulders. Never shake them firmly however, as this can worsen any neck or back injuries they may have. For infants, tap the bottom of their foot and look for a response, such as them opening their eyes or moving.
If the casualty is still unresponsive at this stage, you must call 999 or 112 and place the call on speakerphone whilst you move onto the next steps in the primary survey.
Step 3 – Airway
The third step of the primary survey is to check that the casualty’s airway is open and clear from obstructions. If the casualty is in an unsuitable position for you to check their airway when you find them, the NHS advises that you may need to then gently lay them on their back.
If the casualty is unresponsive, you should:
- Place one hand on their forehead and two fingers under their chin and gently tilt their head back. This prevents their tongue from blocking their airway. Look into their mouth for any other object that could block their airway.
- If you can see something, try to remove it with your fingers. Do not put your fingers in their mouth if you can’t see anything as this could push an obstruction further down the throat.
- Then, move on to the next stage of the primary survey.
If the casualty is responsive, you should:
- Look inside their mouth and check if anything is visibly blocking their airway.
- If there is, encourage them to remove it themselves, either with their hands or by coughing.
- Then, move on to the next stage of the primary survey.
Step 4 – Breathing
Next, you must check whether the casualty is breathing normally. To check their breathing, you should look, listen and feel:
- Look to see if the casualty’s chest is rising and falling.
- Listen for breathing from their nose or mouth.
- Feel for air coming from their nose or mouth on your cheek, tilting their head in the same way you did to check their airway. You must do this for 10 seconds to make sure any breathing you do hear is normal.
If your casualty is responsive and breathing normally, move straight on to the next step of the primary survey.
If your casualty is unresponsive but breathing normally, put them into the recovery position. Then, move on to the next step of the primary survey.
If your casualty is unresponsive and not breathing normally, you should prepare to begin CPR.
Step 5 – Circulation
If the casualty is unresponsive and not breathing normally, or at all, start CPR. If 999 or 112 has not been called yet, ensure they are called before beginning chest compressions.
Ask a bystander to find and bring an AED, if possible.
If you find the casualty is bleeding severely, this must be addressed immediately and take priority over giving CPR. You should try to control and reduce the bleeding by applying direct pressure to the wound with a sterile dressing, if possible, or a clean cloth, as CPR will not be effective if the circulatory system is empty.
Step 6 – Disability
The following steps are for responsive casualties only, who have a clear airway and are breathing normally.
The purpose of this step is to identify and treat (where appropriate) any life-threatening conditions that can affect brain function, such as, head injuries, hypoglycaemia or strokes.
Keep monitoring the casualty and recheck their level of consciousness. Are they alert to time and place, or do they appear confused?
Step 7 – Exposure
Keep the patient warm. Are there any obvious signs of injury? Report what you observe to the emergency call handler.
The primary survey should not take more than two minutes to complete. From the point of no response, you should have the emergency service call handler on speakerphone to talk you through all appropriate steps.
Free DR ABCDE Poster
We have created a poster that shows the steps of the primary survey through the acronym DR ABCDE. You may wish to print this out and display it in your workplace as a handy reminder of what to do if someone needs first aid assistance. The DR ABCDE poster can be downloaded at the link below.
What Should I Do After the DR ABCDE Steps?
After you have completed the primary survey using the DR ABCDE steps, you should carry out what is known as the secondary survey. At this stage, you are trying to find out more about what has happened to the casualty. You should do this through observations, talking with the casualty and physical examinations of their body.
Communicating with the Casualty
Ask the casualty to answer short, simple questions about their symptoms, in as much detail as possible. You should ask them:
- What has happened?
- Are you in any pain and/or feeling confused or disoriented?
- Where is your pain located?
- When did your pain start?
- Can you describe your pain, is it dull or sharp, constant or irregular?
- How would you rate your pain from 1 to 10?
When talking with the casualty, try to get as much information about their medical history and current symptoms as possible. Knowing this will help you to identify what might be wrong and how to treat them. You can use the ‘AMPLE’ acronym and ask the casualty about:
- A: Any allergies they have.
- M: Any medication they take regularly or have been prescribed.
- P: Their previous medical history.
- L: When they last ate or drank something.
- E: What happened leading up to the event and was it due to an illness or accident.
Physical Examination
Having observed the casualty and spoken with them, you should then move on to a physical examination. You should ask yourself:
- What can you see? Carefully check for secondary injuries to the casualty, such as bleeding or bruising. If it’s safe to do so, check whether they can move their limbs.
- What can you feel? Carefully feel over their body to determine whether anything feels unusual, such as swelling or broken bones. Make sure to inform them and ask their permission before doing so.
- What can you smell? Check the casualty for any distinctive smells. A fruity smell on their breath, for example, may be an indication that the person has diabetes.

If the casualty is responsive, talk them through what you’re doing and always ask for permission if you need to loosen or remove any clothing. Remember to treat the person with dignity and respect at all times. You should also make a note of any minor or serious injuries that you find and then pass this information on to the emergency services when they arrive.
Having the confidence in your ability to carry out the primary survey is an essential part of administering first aid. You must understand the order of priority of the seven steps, which can be remembered by the DR ABCDE acronym, and know what action to take in various situations. This knowledge may well help to save someone’s life.
Further Resources:
- Workplace First Aid Training
- What are the Responsibilities of a First Aider?
- Paediatric First Aid Quiz
- How to Support Individuals After Giving First Aid Assistance
- Guidance on What To Do If Someone Is Choking
- CPR Awareness Training


Post Author
